
Thermal paste plays a vital role in the building of new computers, as well as maintaining optimal performance in existing computers. Put simply, without thermal paste, your computer’s central processing unit (CPU) becomes susceptible to overheating, which in turn can cause a range of performance issues and decrease the overall lifespan of the computer.
In this guide, we’ll look at how to safely remove the thermal paste from your CPU, how to re-apply it and other handy tips to ensure you’re able to complete the job successfully, with a minimum amount of fuss. But first, let’s start at the beginning.
What exactly is thermal paste?
Thermal paste is a thermally conductive compound that is applied between a computer’s CPU and CPU cooler, to help remove heat from the processor as efficiently as possible. In short, it helps to keep the CPU cool (especially useful if you’re overclocking your PC).
It works by eliminating air gaps or pockets that are present between the CPU and cooler — by filling these gaps, it creates a consistent heat spreader across the surface, which allows for a transfer of heat from the CPU to its heat sink. Without the use of thermal paste, the CPU would overheat, which could spell disaster for your computer.
How to remove thermal paste
If you’re looking to reapply thermal paste to an existing computer, you’ll first need to remove the old thermal paste. In order to access the CPU to do this, you’ll need to remove the CPU cooler from the machine.
Removing the CPU cooler
Follow these steps to safely remove a CPU cooler:
- Allow your computer to run for 15 minutes — Doing this will soften the thermal paste, which will in turn make it easier to remove the CPU cooler. Cold thermal paste is more likely to cement the CPU to the heat sink.
- Turn off the computer — Switch off and unplug everything, remembering to include the CPU power cord.
- Loosen the cooler’s clips and bolts — The cooler’s manual should provide instructions if you’re unsure on how to do this.
- Gently loosen the cooler — This can be done by gently twisting it back and forth. Just make sure not to pull up on or yank the heat sink, as this may damage the CPU pins. Refer to the manufacturer’s manual or try searching for an instructional video on YouTube if you have any difficulties.
- Allow the heat sink to come off — This should happen naturally once the cooler is loose. If not, simply run the computer again for an hour or so.
How to clean thermal paste off the CPU
Once the cooler has been removed, you should be able to see the old thermal paste, it will generally be a grey or white colour. You’re now ready to remove the thermal paste.
Here’s what you’ll need:
- Microfibre cloth (avoid paper towels, as these can leave a lint residue and/or causing scratching)
- Cotton swabs
- Rubbing alcohol, or a thermal paste remover
- Plastic spudger (optional)
Next, follow these steps:
- Wipe the top of the CPU. Using the microfibre cloth, gently remove as much of the old thermal paste as possible.
- Apply a small amount of the rubbing alcohol or thermal paste remover to the cotton swab or microfibre cloth. Use this to gently, and slowly, wipe the top of the CPU — this will help dislodge any hardened thermal paste. A plastic spudger may also be helpful here.
- Again, use a clean section of the cloth or swab to remove any residual thermal paste, ensuring to also wipe around the edges of the CPU.
- Repeat the above step to remove any residual thermal paste on the underside of the CPU cooler.
- Allow the CPU to dry. Drying times may vary depending on the cleaning solution used, a good rule of thumb is to wait around an hour. Commercial thermal paste removers will likely come with information on drying times.
Avoiding unnecessary damage when removing thermal paste
When cleaning thermal paste off the CPU, it’s important that you only hold the CPU by its edges, and not touch any of the pins or pads on the underside of the chip. Though it’s unlikely that any damage will be done to the chip with careful, methodical cleaning, it’s still important not to rush the process — it’s always better to be safe than sorry when dealing with sensitive and expensive computer parts. You should also ensure that your workspace is clean and free of dust, lint and debris.
How to apply thermal paste
Once the CPU and CPU cooler are clean — or alternatively, are brand-new — you can start the process of applying thermal paste. The most important thing to remember when applying thermal paste is less is more — anything more than a pea-sized amount of paste is too much.
Also, take a few moments to read through the thermal paste’s instructions before starting, in case your particular thermal paste requires a different approach.
Here’s what you’ll need:
- A clean CPU and CPU cooler
- CPU thermal paste
- A microfibre cloth
Follow these steps:
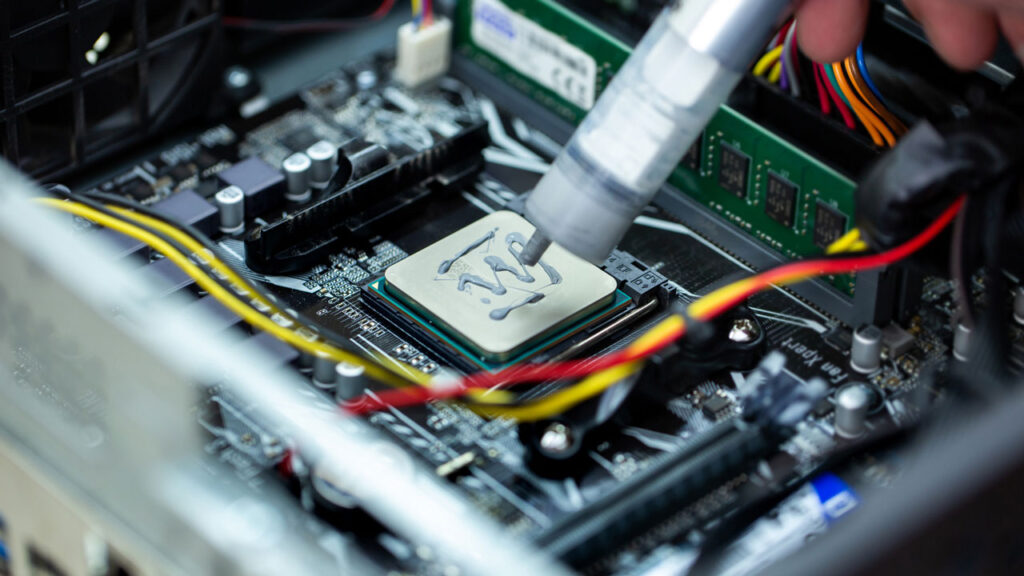
- Ensure the CPU is installed into the motherboard socket, then place a small amount of the thermal paste on to the centre of the CPU. Note that the application method itself doesn’t matter — the result should be the same whether you choose to apply the paste in a pea, line or X formation, as long as the right amount is applied, and it’s placed in the centre.
- Next up, install the CPU cooler, applying top to bottom pressure to the unit. Note that the pressure of the cooler will be sufficient to evenly distribute the paste, there’s no need to spread the paste yourself.
- After the cooler is installed, check the edges of the CPU for any spillages. If required, simply wipe any excess paste with the microfibre cloth.
Save any unused thermal paste for future use, most have a shelf life of around five years, though this may vary between brands.
How often does thermal paste need to be re-applied?
Now that you’ve completed the process of cleaning and applying thermal paste, you may be wondering how often you need to repeat the process. It’s generally recommended that thermal paste be reapplied to existing computers every few years, or if the cooler is removed for any reason.
Thermal paste will typically last quite a while, though it is important to keep an eye on your computer’s temperatures — spiked temperatures may be an indication that the thermal paste is drying up and needs reapplying.
Jim’s I.T — your local IT support professionals
We hope that this post has helped answer your questions on how to clean thermal paste, and reapply it to your computer. Looking for further professional support with a PC or laptop issue? Look no further than Jim’s I.T.
Our expert team provides a range of affordable computer and laptop repair services, designed to get you back up and running with the least amount of headaches and fuss. To ensure your satisfaction, we offer free quotes, fixed pricing and a convenient same day service. Best of all? If we can’t fix it, there’s no fee for you to pay.
Ready to get started? Request a quote or simply get in touch with our friendly, professional team today!