
How to Clean Dust from a PC
As much as we might try to ignore it, dust is an inevitable part of life. It’s in the air we breathe, settles on our furniture, and often finds its way into our computers. While a bit of dust might not seem like a big deal, it can cause major problems for your PC when it accumulates. And it accumulates faster than you think!
So what’s the best way to clean dust from your PC? Thankfully, the entire process is relatively easy. However, if you lack the time or energy, especially if you have to clean multiple computers, you can always hire a professional computer repair company to do it for you. In this post, we’ll be sharing steps on how to clean dust out of your PC, so you can keep it running at optimal performance. Get ready to give your computer a much-needed cleanse!
The problem with dust and your PC
Dust is the enemy of all electronics, and it can significantly impact your computer’s performance. Here are some compelling reasons to do a PC cleaning sooner rather than later:
Dust piles up on PC components and causes overheating.
Think about it — your computer parts generate a lot of heat when running, and if they’re covered in dust, that heat cannot dissipate properly. This can lead to your computer slowing down, thermal throttling, or even permanent hardware damage.
Dust clogs up your computer fans.
Like humans, computers need to breathe, and they do that by absorbing cool air and expelling heat through fans. Dust makes these fans less effective, leading to more overheating and significantly decreased performance.
This is particularly true for the fans of a graphics card, which tends to be the hottest part of your PC. If your GPU fans are covered in dust, you might not be able to run your games as smoothly as you used to, or your rendering programs might be noticeably slow.
Dust can cause short circuits.
Dust can clog up the computer’s integrated circuit boards, causing a malfunction if conductive materials are part of the dust.
Dust can be explosive.
Dense dust from organic compounds (including powdered foods) can explode when it comes into contact with an electric spark or other ignition sources. This, however, is an extremely rare occurrence.
How to clean your computer hardware
Hopefully, the discussion above inspired (or scared) you enough to finally eradicate the dust off your PC. If so, here are easy steps to go about it:
Step 1: Prepare your PC cleaning materials.
Before we discuss cleaning a PC, gathering all of the necessary materials is important. Here’s a list of what you’ll need:
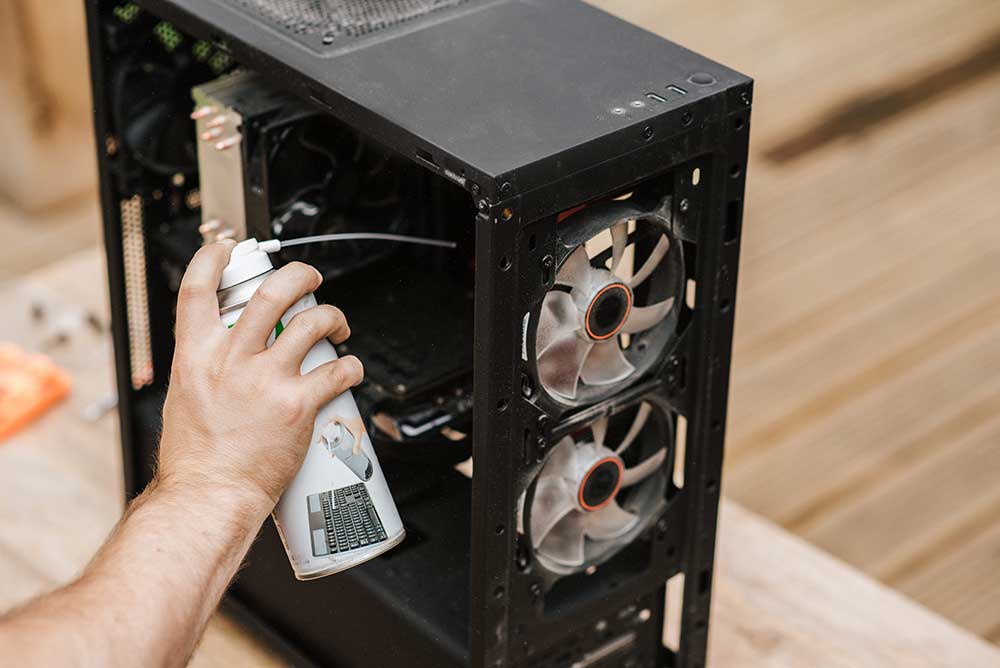
- Can of compressed air — This will be your primary tool for blowing dust out of tight spaces and hard-to-reach areas. People have been using cans of compressed air to clean PCs for a long time, but some alternatives exist. A handheld vacuum cleaner might be able to suck in some dust and debris, but it might not do good in tight corners. You may also even use a leaf blower. Just be sure to do so at a respectable distance because it blows air at a much stronger rate.
- Microfibre cloth — Use this to gently wipe down surfaces like the inside of the PC case. This cloth can remove any dust or dirt the compressed air may have missed.
- Isopropyl alcohol and cotton swabs — Rubbing alcohol can remove stubborn grimes and oily marks.
- Screwdriver — If you need to open up the case to access specific components, you’ll need a screwdriver to remove any screws holding the case together.
- Mask — It’s always a good idea to wear a mask to avoid inhaling dust particles, especially if you have a history of respiratory conditions.
Step 2: Shut down your computer and unplug it.
It goes without saying that before you begin to clean dust from a PC, you must shut it down and unplug it to avoid any electrical shocks. This will also prevent any data loss or corruption while you’re cleaning.
Step 3: Open up your computer.
Depending on the type of computer you have, the process for opening it may vary. If you have a desktop computer, you can usually open the case by removing a few screws on the back or side. Most PC cases have side panels that are pretty straightforward to remove. If you have a laptop, however, you must remove a few screws on the bottom to loosen its casing.
Step 4: Clean the dust from the inside.
Once you have access to the inside of your computer, you’ll want to start by removing any large pieces of dust bunnies or debris you can see. Use the can of compressed air to clean the PC’s motherboard and fans and the brush to remove dust on surfaces gently. Remember to take caution in dealing with the motherboard. You must avoid brushing or touching it as much as you can.
Step 5: Clean the air vents.
Your computer has air vents to keep it cool and prevent it from overheating. These vents can become clogged with dust over time, which can restrict airflow. To clean the air vents, use a can of compressed air to blow the dust out. If the dust deposits are a bit more stubborn, use your brush. Mesh screens also protect most PC case vents, so be sure to brush those too.
Step 6: Clean the fans
Still using your compressed air can and brush, thoroughly clean all the PC fans. Your PC has four kinds of fans:
- CPU fan — This is the fan for the processor, and it’s usually at the centre of the motherboard
- GPU fan — This is the fan attached to your graphics card.
- System fans — These are the fans on your PC case, and they tend to be the dirtiest.
- PSU fan — This is the fan for your power supply.
Step 7: Clean the keyboard and monitor.
Dust can also accumulate on your keyboard and monitor, so it’s important to give these surfaces a good cleaning as well. To clean your keyboard, you can use your brush and compressed air to remove any dust or debris trapped between the keycaps.
To clean your monitor, you can use a soft, dry cloth to wipe the screen gently. You can also use a cleaning solution designed explicitly for monitors to remove any grime or stains, but remember to follow the instructions on the cleaning solution’s label.
Step 8: Reassemble your computer
Once you’ve finished cleaning the dust from your PC, it’s time to reassemble it. Be sure to carefully put back all the screws and ensure everything is securely in place before turning your computer back on.
Step 9: Turn your PC on.
After reassembling your computer, turn it back on and check for any issues. If you notice any problems, such as the computer not booting up or strange noises coming from it, check if all cables are properly inserted. You may want to seek a computer professional if you’re struggling to troubleshoot it. Contact us at Jim’s IT, and we’ll help you out!
How often should you clean your PC?
In general, cleaning the dust from your PC’s exterior at least once a month is a good idea. This also includes the case, keyboard, monitor and mouse. As for the interior of your PC, it’s recommended to clean it at least once a year. This includes removing dust from inside the case and from any visible components, such as the CPU cooler, graphics card and case fans.
Keep in mind that if you live in a particularly dusty environment or use your PC heavily, you may need to clean it more frequently. Additionally, if you notice that your PC is running slower than usual or the fans are making a lot of noise, it could be a sign that it’s time for a PC cleaning.
Final thoughts on how to clean PC dust
Cleaning the dust from your PC is an important step in maintaining the performance and longevity of your computer. Following the steps outlined above, you can easily clean the dust from your PC and keep it running smoothly. Regular PC cleaning will also help to extend its lifespan, saving you money in the long run from costly repairs and replacements — not to mention avoiding the dip in productivity caused by a dusty machine. Remember, a clean PC is a healthy PC!

Tony Altun is the General Manager of Jim's IT, where he leads a nationwide network of IT professionals delivering reliable tech support, computer repairs, and business IT solutions across Australia. With a strong background in IT services, sales, and customer-focused solutions, Tony has built a reputation for driving growth while maintaining a clear focus on service quality and customer satisfaction.